
Outline
- Avalanche blockchain brief intro
- How Avalanche works
- How to add Avalanche Network to MetaMask
- How to transfer Ether from ETH to AVAX
4.1. Avalanche Bridge (AB)
4.2. From ETH to AVAX
4.3. After the transaction - What is wrapped ETH or WETH.e
- Fees for using AB
- How to convert WETH.e to AVAX via Trader Joe
- Closing thoughts
1. Avalanche Blockchain Brief Intro 👩🏻🏫
Avalanche is an EVM-compatible open-source blockchain that enables users to access decentralized applications (Dapps) and allows developers to design their own Dapps and deploy custom blockchains in a scalable, interoperable ecosystem with its subnets. Similar to Cosmos (ATOM) or Polkadot (DOT), it aims to develop a platform where various DeFi apps and bespoke chains can be launched and have a focus on their particular use cases.
Avalanche has an amazing capacity to mitigate the increasing congestion on Ethereum’s network due to rising transaction demand and the spiralling gas prices, officially claiming that they could handle a high throughput of up to 4,500+ transactions per second, with each of them approved just in an instant.
As a 3rd-gen blockchain, Avalanche allows Ethereum Dapps to easily merge or migrate and you can access its ecosystem straight from the MetaMask wallet. The Avalanche network consists of 3 built-in blockchains, and the trio is often referred to as the Primary Network.
- Exchange Chain (X-Chain)
- Platform Chain (P-Chain)
- Contract Chain (C-Chain)
2. How Avalanche Works ⛓
The X-Chain processes digital assets with high scalability, creating assets and having them traded on a P2P basis. One of the assets running on the chain is the native token AVAX. Any transaction issued to a blockchain on Avalanche must be done with this token.
The P-Chain is mainly responsible for business on the platform such as creating subnets (validators), coordinating validators of different networks, and staking AVAX. On the subnets, validators can enjoy full control over their own business model, data, and virtual machines, and also take full advantage of the functions and security across the AVAX network.
The C-Chain is Avalanche’s default blockchain, which enables you to interact with the smart contract. Developers can apply the same code of the C-Chain to build on Ethereum. Besides, it allows Dapps to migrate to AVAX and supports MetaMask wallet, being a key role in the compatibility with Ethereum’s Virtual Machine (EVM).
To sum up, the X-Chain is mainly responsible for digitalizing and storing your assets, the P-Chain is used for staking, while the C-Chain allows you to interact with smart contracts.
3. How to add Avalanche Network to Metamask 🦊
MetaMask is a powerful web3 crypto wallet that allows you to trade tokens, store cryptos, host a vast array of Dapps, and access the ETH chain ecosystem, including Avalanche. Follow the steps below to add Avalanche network to your MetaMask wallet.
3 Steps to Add AVAX to MetaMask
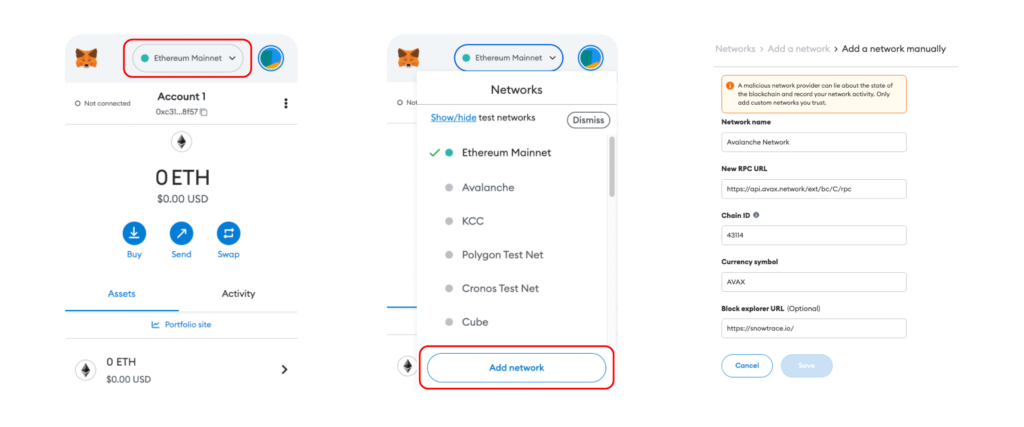
- Log into MetaMask ➜ click the Network drop-down on the top right
- Click Add Network at the bottom
- Insert the following details where applicable:
- Network Name: Avalanche Network
- New RPC URL: https://api.avax.network/ext/bc/C/rpc
- ChainID: 43114
- Symbol: AVAX
- Explorer: https://snowtrace.io/
Once the process goes through, you’ll see a little green box popping up at the bottom right of your screen that reads “Avalanche Network was successfully added!” or simply the ticker symbol “AVAX” at the center of the page. For more info about how to add web3 blockchains to web3 wallets, check out this article.
4. How to Bridge Ether from Ethereum to Avalanche 🤷🏼
If you have ERC-20 tokens and wish to port them from ETH to AVAX, then the official bridge – Avalanche Bridge – is possibly your best bet. Now, we’ll go through the basics of Avalanche Bridge and showcase how to carry out the AVAX-bound swap using Ether (ETH).
4.1. Avalanche Bridge (AB)
The Avalanche Bridge (AB for short) is the official cross-chain bridge of the brand, and can be used to transfer ERC20 tokens, including wrapped tokens, WETH, or WBTC, from Ethereum to the C-Chain and vice versa.
AB was created in place of the initial Avalanche-Ethereum Bridge (AEB). The new bridge is very much favored thanks to its high trading speed and low gas fees. You’ll need a MateMask wallet to interact with it.
4.2. From ETH to Avalanche Chain (AVAX)
You’ve got your Avalanche network configured on your MetaMask, now you may get some ETH bridged over AVAX via AB. Here we give you a step-by-step guide. Before making a transfer, make sure your MetaMask account is funded with ETH.
6 steps to transfer ETH from Ethereum Chain to Avalanche Chain (AVAX)
- Go to https://www.avax.network/
- Find “Individual” on the top ➜ Choose Avalanche Bridge
- Select the web3 wallet you have; in this case, we connect MetaMask
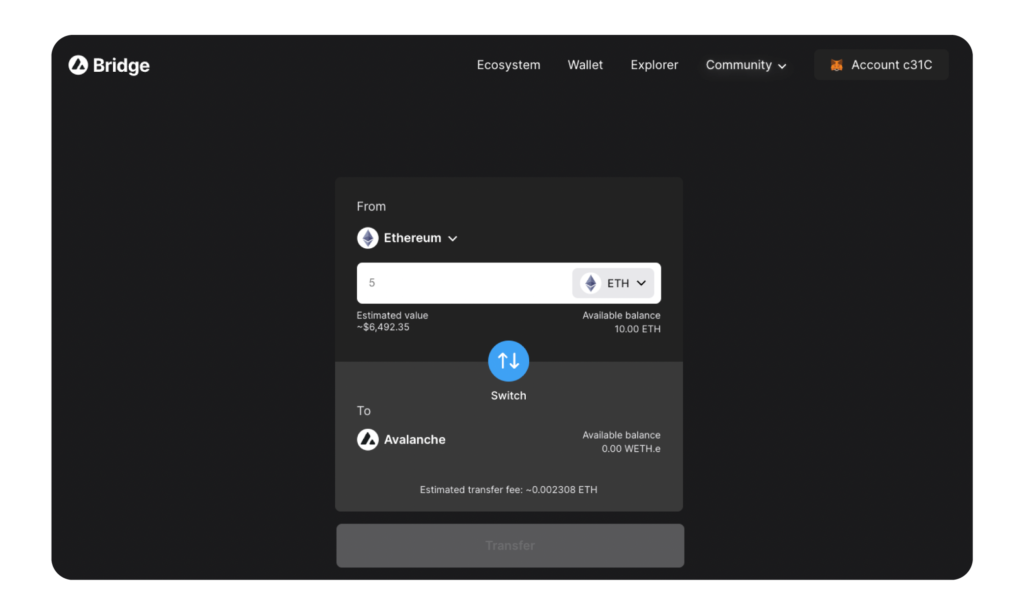
- Follow the instructions and you’ll arrive at the token swap page as shown below
- Click the extension MetaMask wallet on the top right ➜ Click the dropdown menu on the top and choose Ethereum Mainnet to switch to the Ethereum network
- At the From section, opt for ETH and decide on how much you’d like to transfer ➜ Transfer ➜ Confirm (make sure you have enough gas though)
After you hit confirm you’ll see a notification on the extension MetaMask icon. Open that up and click Confirm again to complete the transaction. It will bring you to a screen and show you the transaction breakdown. This would usually take about 10-15 mins.
Notice that what you’re gonna really get is not ETH, not AVAX, but wrapped Ethereum (WETH.e). Once you have WETH.e in your Avalanche MetaMask wallet, you convert it to other tokens using DEXs like Pangolin or Trader Joe XYZ, which is the largest DEX on the AVAX network and charges a 0.2% fee per tx.
4.3. After the transaction
Once you’re done, it’s gonna bring you to a screen with a summary of what was going on during your transaction. You’ll know the trading time, the gas fee, and the transaction fee on either side. An important part to note here is that you have to make sure the token (WETH.e) is added to the wallet you use. So, simply follow the steps below.
4 steps to check if your transfer goes through
- Click “Make sure the token is added to your wallet”
- Click the MetaMask fox icon under Warpped Token (Hover your cursor over the icon, it’ll read “Add token support to MetaMask”) to do it automatically
- MetaMask will automatically recognize that now your Avalanche wallet has WETH.e in it. Then click Add Token
- Check Assets from the extension MetaMask wallet and you’ll see the successfully swapped WETH.e right there
5. What is wrapped ETH or WETH.e
Many of you might wonder why there is such a wrapped version of Ether. Simply put, the wrapped Ethereum (WETH.e) is a form of cryptocurrency that complies with the ERC20 standard and stands for ETH 1:1 on the C-Chain network. As you bridge your ETH token to AVAX, the network stores it in a wallet and provides users with this wrapped token – WETH.e, which is transferrable on the Ethereum mainnet. Conforming to this ERC20 standard, WETH.e can be highly useful and functional across Dapps (e.g. OpenSea) that handle ERC20 tokens.
6. Fees for using Avalanche Bridge
Accessing DeFi services such as a cross-chain tx, a DEX for token swaps, or a wallet like MetaMask will require a gas fee. As Ethereum’s Merge didn’t change the fee structure much, gas fees aren’t much affected either.
Besides the gas fee for accessing the ETH chain, a transaction fee will also be charged for using the AVAX bridge. When moving assets from ETH to AVAX, the bridge (AB) charges an in-kind transaction fee (think of this fee as XY Fee when you use Swap to bridge tokens), which is dynamic and influenced by factors such as congestion or business of the network.

The transaction fee is technically calculated using real-time asset prices, the current ETH gas fee (as noted earlier), and the approximate amount of gas used by the ETH transaction. For more information, please check the official document Avalanche Transaction Fee.
As of the time of writing, the tx fee to swap 1 ETH to AVAX is around $3 worth of the ERC20 assets being transferred (now this is what the word in-kind above suggests). The transaction fees of other tokens between ETH and AVAX range from roughly $1.5 to $5.
7. How to convert WETH.e to AVAX via Trader Joe
Now that you’ve bridged your Ethereum over to the AVAX network. As AB only handles cross-chain tx of the same token type, you will need a DEX to help you convert your WETH.e to other tokens. Suppose you wish to swap your WETH.e for AVAX, the best way to do this is to use a DEX called “Trader Joe XYX”.
5 Steps to swap WETH.e to AVAX
- Go to Trader Joe XYZ ➜ Connect it with your wallet (MetaMask)
- Click Trade on the top left corner
- Choose WETH.e in the From section, and AVAX in the To section
- Decide on the amount you want to swap or simply click MAX.
- Click on Approve WETH.e ➜ Hit Conform on MetaMask
8. Closing thoughts
This article walks you through the very basics of the Avalanche network, the 3 chains on the primary network, how to connect with MetaMask, what you need to do before, during, and after the cross-chain transaction, as well as the fees of using AB. Now you must have been more familiar with how the AVAX network works and how to transfer ERC20 tokens from the Ethereum chain to the AVAX chain. In the future, there will be another article that goes into detail about the entire ecosystem of Avalanche. Stay tuned with XY Blog to find out more about the digital assets space!
About XY Finance
XY Finance is a cross-chain interoperability protocol aggregating DEXs & Bridges. With the ultimate routing across multi-chains, borderless and seamless swapping is just one click away.
XY Finance Official Channels
XY Finance | Discord | Twitter | Telegram | Documents | Partnership Form